Adventures in SoftRAID
I’ve had an adventure with my OWC Thunderbay 4-disk drive array this week. I’ve emerged the other side, ultimately unscathed, but the journey certainly could have been easier. Let’s take a look.
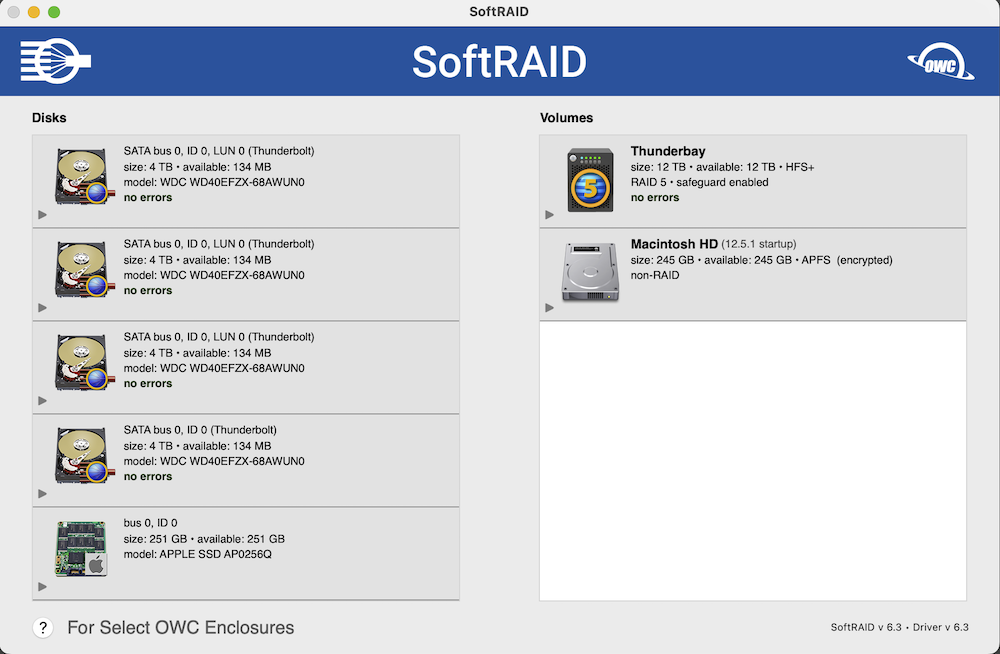
It all started when I reached the capacity of my RAID-5 formatted array of 4 x 2TB drives. The 6TB of storage this provided me was almost full. This array sits in a cupboard connected to a headless M1 mac mini, so all operations need to be managed through screen sharing with Screens or SSH.
Incidentally, for many months now this RAID-array, with SoftRAID as the management software has been causing hardware panics and reboots on the M1 mac mini it’s connected to. My winding adventure has also been able to resolve this problem - although word is Ventura will eliminate some macOS bugs that were the root cause.
Preparing the Way
Back to the story… the SoftRAID software has a neat feature within it that allows the user to resize a RAID volume if the disks have additional capacity than is used by the volume. RAID 5 allows any one disk to be removed at a time and continue to operate. This feature I would use to my advantage to grow the size of my array.
I bought four new 4TB disks. One at a time, I removed an existing 2TB disk - setting the array to a degraded mode. I dropped in a replacement 4TB drive, and the Thunderbay took a day or so to rebuild the array using 2TB of the new 4TB. I did this same thing four times. It took days, but I ended up with my existing array of 4 x 2TB but now it was on 4 x 4TB disks.
No Resize for You ⛔️
Now I could use that nifty feature to upsize my volume to 12TB. I happily clicked the button and tried to enter my new volume size. Nothing. Nada. Zip. It wouldn’t let me go beyond the current 6TB. Oh no.
Off to the SoftRaid website and support forums I go. I eventually find a support note - and random threads in the forum - that there is a known bug in SoftRAID 6.3 that prevents resizing and growing RAID arrays. The solution? Use SoftRAID 6.0.3. Cool! I’ll do that. But SoftRAID 6.0.3 is only compatible with Big Sur. Not Monterey. Hmm. All my Mac’s are upgraded and I don’t fancy trying to downgrade any of them.
This is a dead end. There is no resolution. Except one. Erase the RAID array and start again, formatting the drives and going from scratch. ARGH! On the bright side, by formatting the drives I could select a 64kb stripe size instead of the recommended and preferred 16kb stripe size the RAID array was using now and that was causing the kernel panics on any macOS version less than Ventura for M1 Macs.
Belt and Suspenders
So I needed to find a way to backup 6TB of data.
I bought a USB 3.1 hard drive caddy. My friend Nick allowed me save some dollars by lending me two 6TB drives which I could use as backup media.
So now how to actually undertake the backup in a way that was resilient to failures, kernel panics and restarts? Running rsync from the command line was one option - but I’m not a command line guru and was worried I’d get my flags wrong and not properly copy metadata. Aha, I have a license for SuperDuper! That’ll do it! Except my license had expired so I couldn’t use it. Before I bought a new license, I checked in on Carbon Copy Cloner, which I know other people praise. Not only does it feature a more up-to-date (and informative) user interface, it offers a fully-featured 30-day trial. Brilliant!
I setup CCC to create a clone of my RAID. Off it went. It took about 24 hours. This was extended because what I did forget to do was erase the Time Machine backups that were on the array. I shouldn’t have kept them, but oh well, I left it alone.
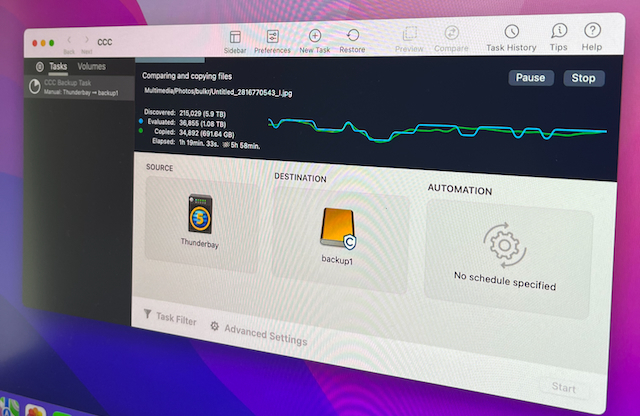
Nick recommended I actually make two backups, because he couldn’t verify the quality of the disks he’d lent to me. Despite no errors being reported from the first backup, I did as suggested - setting CCC to do a repeat backup (but this time I deleted the Time Machine backups first). Another almost 24 hours passed.
Erase and Restore 😱
Now, onto erasure of the RAID array itself. This was the ‘gulp’ moment of the process. No going back from here. I re-initialised the drives and reset the volume, and thankfully, was able to choose a volume size of 12TB. And, as mentioned, I went with the 64kb stripe size to avoid kernel panics (even though I will probably regret that once Ventura is released with support for 16kb stripes).
RAID array ready, it was time to restore from my backup. Queue another long process. The next day, I check the completed restore, which… had errors. Nick, this is where I thank you for suggesting the ‘double backup’ strategy. While the backup drive had no errors writing content, it had troubles reading it. This is also where I was very thankful to have chosen Carbon Copy Cloner which offers a clear and helpful log file showing the failed files. There was only about a dozen that didn’t work, so I was able to restore all of these successfully from the second backup.
With this done, the RAID array was back! And almost everything picked up from where I left off. As I had transferred some invisible BackBlaze configuration files, I had to re-associate the new drive with my account, which was an easy toggle. I had to reset the Time Machine settings in the MacBook Airs that back up to it, so they would find the new drive. Finally, I had to reinitiate Content Caching on the mac mini by turning it off and on again.
After a week, I’m up and running once more.
Will I do all this again when Ventura is released and I want to leverage 16kb stripe sizing? I don’t know if it’s worth it, to be honest.